
主题
可观测性 是使用大型语言模型 (LLM) 构建的应用程序的关键需求。LLM 具有非确定性,这意味着相同的提示可能产生不同的响应。这种行为使得调试和监控比传统软件更具挑战性。
LangSmith 通过提供应用程序如何处理请求的端到端可见性来解决这个问题。每个请求都会生成一个 追踪,它捕获了所发生事件的完整记录。在一个追踪内部是独立的 运行,即您的应用程序执行的具体操作,例如一次 LLM 调用或一个检索步骤。追踪运行允许您检查、调试和验证应用程序的行为。
在本快速入门中,您将设置一个最小的 检索增强生成 (RAG) 应用程序,并使用 LangSmith 添加追踪功能。您将:
- 配置您的环境。
- 创建一个检索上下文并调用 LLM 的应用程序。
- 启用追踪以捕获检索步骤和 LLM 调用。
- 在 LangSmith UI 中查看生成的追踪。
如果您更喜欢观看关于追踪入门的视频,请参考快速入门的 视频指南。
先决条件
开始之前,请确保您拥有:
- 一个 LangSmith 账户:在 smith.langchain.com 注册或登录。
- 一个 LangSmith API 密钥:请遵循 创建 API 密钥 指南。
- 一个 OpenAI API 密钥:从 OpenAI 控制台 生成。
本快速入门中的示例应用程序将使用 OpenAI 作为 LLM 提供商。您可以针对您应用程序的 LLM 提供商调整此示例。
如果您正在使用 LangChain 或 LangGraph 构建应用程序,您可以通过单个环境变量启用 LangSmith 追踪。请阅读 使用 LangChain 追踪 或 使用 LangGraph 追踪 指南开始使用。
1. 创建目录并安装依赖项
在您的终端中,为您的项目创建一个目录并在您的环境中安装依赖项:
bash
mkdir ls-observability-quickstart && cd ls-observability-quickstart
python -m venv .venv && source .venv/bin/activate
python -m pip install --upgrade pip
pip install -U langsmith openai
bash
mkdir ls-observability-quickstart-ts && cd ls-observability-quickstart-ts
npm init -y
npm install langsmith openai typescript ts-node
npx tsc --init
2. 设置环境变量
设置以下环境变量:
LANGSMITH_TRACINGLANGSMITH_API_KEYOPENAI_API_KEY(或您的 LLM 提供商的 API 密钥)- (可选)
LANGSMITH_WORKSPACE_ID:如果您的 LangSmith API 密钥链接到多个工作区,请设置此变量以指定要使用的工作区。
bash
export LANGSMITH_TRACING=true
export LANGSMITH_API_KEY="<your-langsmith-api-key>"
export OPENAI_API_KEY="<your-openai-api-key>"
export LANGSMITH_WORKSPACE_ID="<your-workspace-id>"
如果您使用 Anthropic,请使用 Anthropic 包装器 来追踪您的调用。对于其他提供商,请使用 可追踪包装器。
3. 定义您的应用程序
您可以使用此步骤中概述的示例应用程序代码来检测一个 RAG 应用程序。或者,您可以使用包含 LLM 调用的自己的应用程序代码。
这是一个最小的 RAG 应用程序,它直接使用 OpenAI SDK,尚未添加任何 LangSmith 追踪。它包含三个主要部分:
- 检索器函数:模拟始终返回相同字符串的文档检索。
- OpenAI 客户端:实例化一个普通的 OpenAI 客户端以发送聊天补全请求。
- RAG 函数:将检索到的文档与用户的问题结合以形成系统提示,使用
gpt-4o-mini调用chat.completions.create()端点,并返回助手的响应。
将以下代码添加到您的应用程序文件中(例如,app.py 或 app.ts):
python
from openai import OpenAI

def retriever(query: str):
    # 最小示例检索器
    return ["Harrison worked at Kensho"]

# OpenAI 客户端调用(尚未包装)
client = OpenAI()

def rag(question: str) -> str:
    docs = retriever(question)
    system_message = (
        "Answer the user's question using only the provided information below:\n"
        + "\n".join(docs)
    )

    # 此调用尚未被追踪
    resp = client.chat.completions.create(
        model="gpt-4o-mini",
        messages=[
            {"role": "system", "content": system_message},
            {"role": "user", "content": question},
        ],
    )
    return resp.choices[0].message.content

if __name__ == "__main__":
    print(rag("Where did Harrison work?"))
typescript
import "dotenv/config";
import OpenAI from "openai";

// 最小示例检索器
function retriever(query: string): string[] {
    return ["Harrison worked at Kensho"];
}

// OpenAI 客户端调用(尚未包装)
const client = new OpenAI();

async function rag(question: string) {
    const docs = retriever(question);
    const systemMessage =
        "Answer the user's question using only the provided information below:\n" +
        docs.join("\n");

    // 此调用尚未被追踪
    const resp = await client.chat.completions.create({
        model: "gpt-4o-mini",
        messages: [
            { role: "system", content: systemMessage },
            { role: "user", content: question },
        ],
    });

    return resp.choices[0].message?.content;
}

(async () => {
  console.log(await rag("Where did Harrison work?"));
})();
4. 追踪 LLM 调用
首先,您将追踪所有 OpenAI 调用。LangSmith 提供了包装器:
- Python:
wrap_openai - TypeScript:
wrapOpenAI
此代码片段包装了 OpenAI 客户端,以便每个后续的模型调用都会自动作为追踪的子运行记录到 LangSmith 中。
- 在您的应用程序文件中包含高亮显示的行:
python
from openai import OpenAI
from langsmith.wrappers import wrap_openai  # traces openai calls

def retriever(query: str):
    return ["Harrison worked at Kensho"]

client = wrap_openai(OpenAI())  # log traces by wrapping the model calls

def rag(question: str) -> str:
    docs = retriever(question)
    system_message = (
        "Answer the user's question using only the provided information below:\n"
        + "\n".join(docs)
    )
    resp = client.chat.completions.create(
        model="gpt-4o-mini",
        messages=[
            {"role": "system", "content": system_message},
            {"role": "user", "content": question},
        ],
    )
    return resp.choices[0].message.content

if __name__ == "__main__":
    print(rag("Where did Harrison work?"))
typescript
import "dotenv/config";
import OpenAI from "openai";
import { wrapOpenAI } from "langsmith/wrappers"; // traces openai calls

function retriever(query: string): string[] {
    return ["Harrison worked at Kensho"];
}

const client = wrapOpenAI(new OpenAI()); // log traces by wrapping the model calls

async function rag(question: string) {
    const docs = retriever(question);
    const systemMessage =
        "Answer the user's question using only the provided information below:\n" +
        docs.join("\n");

    const resp = await client.chat.completions.create({
        model: "gpt-4o-mini",
        messages: [
            { role: "system", content: systemMessage },
            { role: "user", content: question },
        ],
    });

    return resp.choices[0].message?.content;
}

(async () => {
    console.log(await rag("Where did Harrison work?"));
})();- 调用您的应用程序:
bash
python app.pybash
npx ts-node app.ts您将收到以下输出:
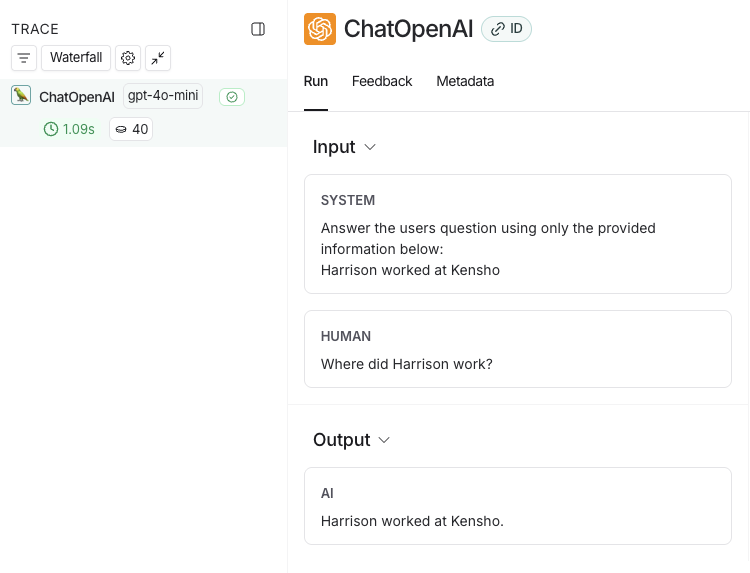
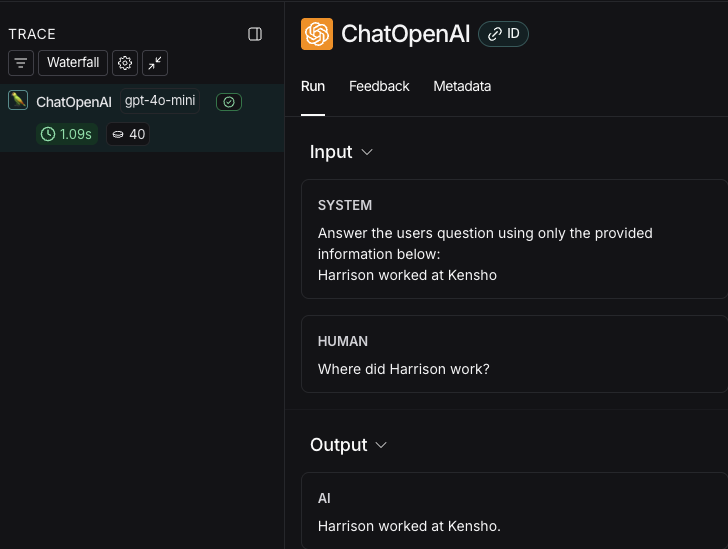
Harrison worked at Kensho.- 在 LangSmith UI 中,导航到您工作区的 default 追踪项目(或您在 步骤 2 中指定的工作区)。您将看到刚刚检测的 OpenAI 调用。
5. 追踪整个应用程序
您还可以使用 Python 或 TypeScript 的 traceable 装饰器来追踪整个应用程序,而不仅仅是 LLM 调用。
- 在您的应用程序文件中包含高亮显示的代码:
python
from openai import OpenAI
from langsmith.wrappers import wrap_openai
from langsmith import traceable

def retriever(query: str):
    return ["Harrison worked at Kensho"]

client = wrap_openai(OpenAI())  # keep this to capture the prompt and response from the LLM

@traceable
def rag(question: str) -> str:
    docs = retriever(question)
    system_message = (
        "Answer the user's question using only the provided information below:\n"
        + "\n".join(docs)
    )
    resp = client.chat.completions.create(
        model="gpt-4o-mini",
        messages=[
            {"role": "system", "content": system_message},
            {"role": "user", "content": question},
        ],
    )
    return resp.choices[0].message.content

if __name__ == "__main__":
    print(rag("Where did Harrison work?"))
typescript
import "dotenv/config";
import OpenAI from "openai";
import { wrapOpenAI, traceable } from "langsmith/wrappers";

function retriever(query: string): string[] {
    return ["Harrison worked at Kensho"];
}

const client = wrapOpenAI(new OpenAI()); // keep this to capture the prompt and response from the LLM

const rag = traceable(async (question: string) => {
    const docs = retriever(question);
    const systemMessage =
        "Answer the user's question using only the provided information below:\n" +
        docs.join("\n");

    const resp = await client.chat.completions.create({
        model: "gpt-4o-mini",
        messages: [
            { role: "system", content: systemMessage },
            { role: "user", content: question },
        ],
    });

    return resp.choices[0].message?.content;
});

(async () => {
    console.log(await rag("Where did Harrison work?"));
})();- 再次调用应用程序以创建一个运行:
bash
python app.pybash
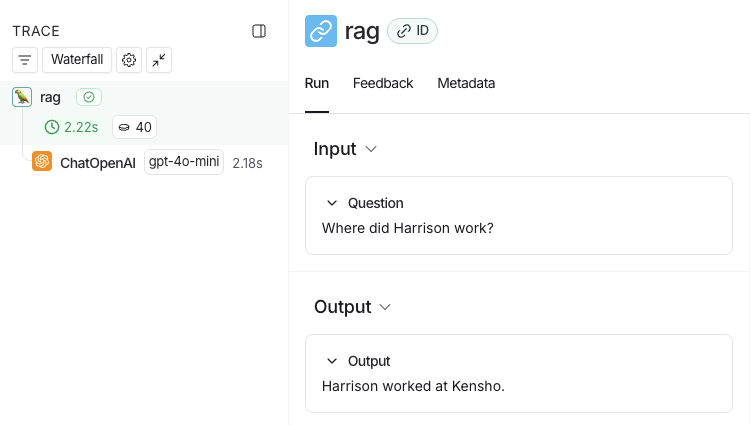
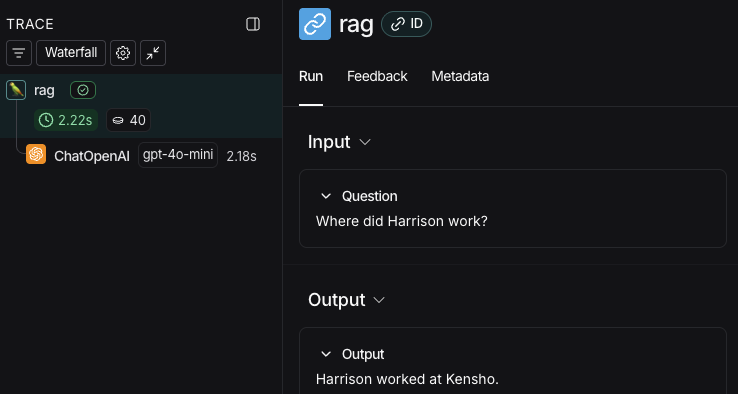
npx ts-node app.ts- 返回 LangSmith UI,导航到您工作区的 default 追踪项目(或您在 步骤 2 中指定的工作区)。您将找到包含 rag 步骤和 ChatOpenAI LLM 调用的整个应用程序管道的追踪。
后续步骤
以下是一些您可能接下来想要探索的主题:
- 追踪集成 为各种 LLM 提供商和代理框架提供支持。
- 过滤追踪 可以帮助您有效地导航和分析包含大量数据的追踪项目中的数据。
- 追踪 RAG 应用程序 是一个完整的教程,它为应用程序从开发到生产添加了可观测性。
- 将追踪发送到特定项目 可以更改您追踪的目标项目。
记录追踪后,使用 Polly 对其进行分析,并获得关于应用程序性能的 AI 驱动洞察。